Targeting first and last rows in CSS grid layouts
I was recently asked is it possible to select every element in the last row of a grid containing an arbitrary number of items using CSS selectors? Not wanting to shy away from a challenge, I started hacking and found a solution which I’ve written up along with a few other techniques for targeting elements in the first or last row of a grid.
View the demo
Throughout this post I’ll be using the terms “balanced grid” and “unbalanced grid”. So we’re clear, a balanced grid has content in every grid cell and an unbalanced grid doesn’t have enough content to fill every cell, resulting in whitespace in the last row.
Example of a balanced (left) and unbalanced (right) gridFor this post I’ll be working with the follow test markup. These techniques are very flexible and can be adapted to work with any markup that uses sibling elements to create a grid.
<ul> <li>Grid item 1</li> <li>Grid item 2</li> ... <li>Grid item 14</li> <li>Grid item 15</li> </ul>Styling the first row of a grid
Targeting elements in the first row of a gridTargeting elements in the first row of a grid is relatively simple. It doesn’t matter if the grid is balanced or unbalanced, the same solution applies to both cases. We need a selector that will only target the first x elements, where x is the number of columns in the grid. We can do that with the :nth-child pseudo-class:
li:nth-child(-n+x) { /* Add style rules */ }For a 3 column grid:
li:nth-child(-n+3) { background-color: red; }For a 5 column grid:
li:nth-child(-n+5) { background-color: green; }For a 12 column grid:
li:nth-child(-n+12) { background-color: blue; }Styling the last row of a balanced grid
Targeting elements in the last row of a balanced gridTargeting elements in the last row of a grid is simple if the grid is balanced. The same principles used to target the first row are used here except we’ll use the :nth-last-child pseudo-class to target the last x elements in the grid. Again, we’re substituting x with number of columns in the grid.
li:nth-last-child(-n+x) { /* Add style rules */ }Last row of a balanced 3 column grid:
li:nth-last-child(-n+3) { background-color: red; }Last row of a balanced 5 column grid:
li:nth-last-child(-n+5) { background-color: green; }Last row of a balanced 12 column grid:
li:nth-last-child(-n+12) { background-color: blue; }Last row of a balanced or unbalanced grid
Targeting elements in the last row of an unbalanced gridStyling elements in the last row is a little more tricky if the grid is unbalanced. Unlike the selector used for a balanced grid, we can’t just target the last xth elements and style them. What if the grid has 5 columns with only 3 elements in the last row? – we would target the last 2 elements in the previous row too.
To style the last row of a grid we’re going to use the following rule, again, substituting x with number of columns in the grid.
li:nth-child(Xn+1):nth-last-child(-n+X), li:nth-child(Xn+1):nth-last-child(-n+X) ~ li { /* Add style rules */ }The :nth-child(Xn+1) pseudo-class will target every xth element in the grid, which will be the first item in each row. The :nth-last-child(-n+X) pseudo-class will target the last x elements in the grid. Combining these pseudo-classes will only target elements that match both, which in our case is the first element in the last row of the grid.
To select all elements in the last row we add a general sibling combinator ~ to the previous selector so it targets everything after the first element in the last row.
Last row of a balanced or unbalanced 3 column grid:
li:nth-child(3n+1):nth-last-child(-n+3), li:nth-child(3n+1):nth-last-child(-n+3) ~ li { background-color: red; }Last row of a balanced or unbalanced 5 column grid:
li:nth-child(5n+1):nth-last-child(-n+5), li:nth-child(5n+1):nth-last-child(-n+5) ~ li { background-color: green; }Last row of a balanced or unbalanced 12 column grid:
li:nth-child(12n+1):nth-last-child(-n+12), li:nth-child(12n+1):nth-last-child(-n+12) ~ li { background-color: blue; }If the grid will always have two or more rows, or if you want to completely ignore single row grids, a simpler selector can be used. This selector will fail to match the first item in a grid with a single row. To use it, substitute x with the number of columns in the grid and y with the number of columns in the grid +1:
li:nth-child(Xn):nth-last-child(-n+Y) ~ li { /* Add style rules */ }Last row of a balanced or unbalanced 3 column grid with more than one row:
li:nth-child(3n):nth-last-child(-n+4) ~ li { background-color: red; }Last row of a balanced or unbalanced 5 column grid with more than one row:
li:nth-child(5n):nth-last-child(-n+6) ~ li { background-color: green; }Last row of a balanced or unbalanced 12 column grid with more than one row:
li:nth-child(12n):nth-last-child(-n+13) ~ li { background-color: green; }The end
I hope you found this useful.
keithclark.co.uk
Fight Div-itis and Class-itis With the 960 Grid System
Years ago, HTML tables were the standard for laying out web pages. CSS and semantic thinking changed that, and today CSS frameworks make designing relatively easy.
But they can also generate a surprising number of superfluous elements.
The 960 Grid System encourages the addition of <div> elements and class attributes, especially on complicated pages. Is this really an improvement over nested tables?
Creating cleaner code means going beyond the framework and thinking about what it really represents.
CSS frameworks provide a workflow solution, namely a rapid deployment of grid-based web layouts. One of the most popular frameworks today is the 960 Grid System (960.gs), named after its default width. With practice, 960.gs can be a great tool for any web designer. But it also revisits a few old problems.
Before CSS saw widespread use, tables provided all the layout a web designer needed. More complicated designs had tables nested within tables, but used in excess these created a tangled mess of HTML. CSS-based layouts lured designers with the promise of less HTML; they also appealed to semantics enthusiasts. Simply put, CSS encouraged the use of HTML that described what content was about, not what it should look like.
As designers learned to use CSS, div elements replaced tables. But divs can be—and often are—nested, just like tables.
The Spread of Class-itis and Div-itis
Clear, lean code offers many advantages. It’s easy to fix, quick to download and causes fewer problems across different types of browsers. Relevant tags help screen readers, search engines and mobile devices interpret meaning in addition to layout.
Other than the semantics, the great advantage of using <div>…</div> over <table><tr><td>…</td></tr></table> is that we end up with less code to do the same job. But now designers face a glut of classes and divs.
Do CSS frameworks such as 960.gs recreate the underlying problem with tables? If their goal is efficient HTML, can designers and developers use 960.gs without spreading “class-itis” (i.e. excessive use of classes) and “div-itis” (i.e. so many divs that tables start looking good again)? Yes, they can.
To understand how, we need to look at the framework itself.
A Rundown of 960.gs
960.gs provides a set of columns, written in CSS, that facilitate the laying out of web pages. Download the files, add them to your website and it’s ready to go. No special plug-ins or new technology are needed, and you can use it in conjunction with other CSS files.
Columns are contained within blocks called (naturally) “containers.” The defaults are container_12 and container_16, which divide into 12 and 16 columns, respectively. Custom sizes are available.
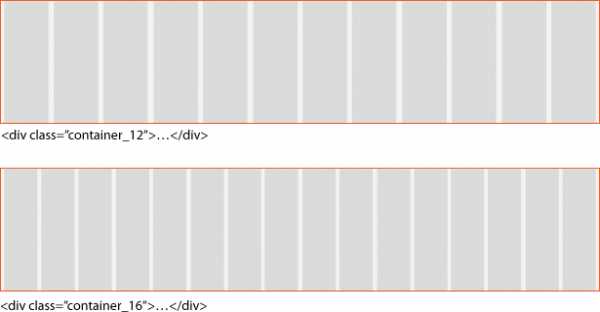
The diagram above shows the two default containers with 12 and 16 columns. The gray won’t be visible on your final website, of course. The columns merely show where blocks, called “grids,” can be arranged.
A grid is a block of content that can cross more than one column in a container. Grids float left by virtue of being held in .container_x, making them ideal for modular layouts. The width of each block is determined by which grid you apply to it: grid_1 is one column wide, grid_5 is five columns wide, etc.
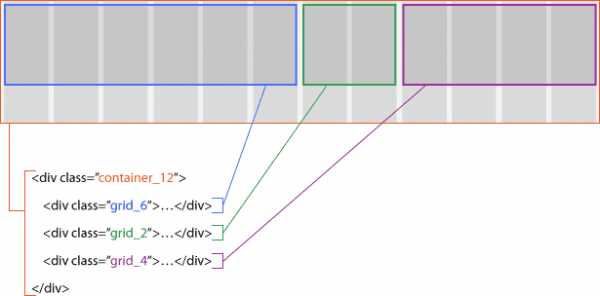
Above, .container_12 holds three grids. Each grid, in turn, would hold different elements of the page’s content.
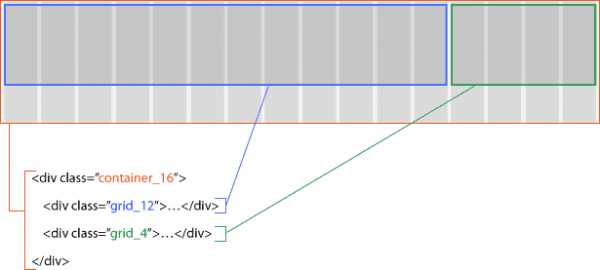
Above, .container_16 holds two blocks of 12 and 4 columns, respectively. Like .container_12, this 16-column-wide layout measures 960 pixels wide—but its columns are narrower.
Resizing the grids in which the content’s elements fit is simple: change the grid_x in each div.
The official 960.gs website showcases websites that were built on the framework, and it also provides page templates, links to a custom grid generator and the framework itself. Detailed instructions are included, too, because there’s more to learn. Grid margins and the ability to step into gutters between grids make the system even more flexible.
In spite of these benefits, embedding <div>…</div> in <div>…</div> encourages coders to use many class attributes (class-itis) and divs (div-itis).
Solutions
Arguing against tables for layout is easy enough. But using three or more levels of nested divs doesn’t solve the problem—it just replaces one set of tags with another. Frameworks help but don’t always solve the dilemma. With a little forethought, many of these problems can be avoided.
Only Use Classes That You Actually Need
The simplest solution to excessive CSS code is to cut out what isn’t necessary. 960.gs was conceived as a wireframing tool, meant to be replaced when the website goes live. It includes more than 180 class definitions.
If your design is structured on, say, .container_12 and never uses more than .grid_5 and .grid_7, then remove the others from the CSS.
Apply class=”grid_x” to Appropriate Elements: Headings, Images, Links, Paragraphs
The .container_x and .grid_x classes aren’t restricted to div elements. The class attribute can be applied to any element except html, head, meta, param, script, title and style—so, practically anything in the body. If a pair of div tags enclose only one item, then they may be unnecessary.
Applying Grid Code to Non-Divs
| <div><h2>…</h2></div> | <h2>…</h2> |
| <div><img src="…" alt="photo" /></div> | <img src="…" alt="photo" /> |
| <div><ul><li>…</li><li>…</li><li>…</li><li>…</li></ul></div> | <ul><li>…</li><li>…</li><li>…</li><li>…</li></ul> |
| <table><tr><td><a href="#">…</a></td><td><a href="#">…</a></td><td><a href="#">…</a></td><td><a href="#">…</a></td></tr></table> | <a href="#">…</a><a href="#">…</a><a href="#">…</a><a href="#">…</a> |
Grant Grid Properties to Certain Elements
Being simple CSS, .grid_x has properties that would work with any other class name—or any element. By copying the properties to certain elements, extra classes become unnecessary.
.examples li { (properties of .grid_4) }
<ul> <li>…</li> <li>…</li> <li>…</li> </ul>Below, applying the grid to list items creates even columns, with minimal changes to the HTML.
CSS turns the above list into a multi-column group. If you need a normal list with bullet points, just discard the attribute. Is this semantic? Certainly—as long as the content merits a list. The CSS merely changes how each bullet point is presented.
Another example:
.photos p { (properties of .grid_10) } .photos img { (properties of .grid_6) } <div> <img src="…" alt="photo" /> <p>First caption</p> <img src="…" alt="photo" /> <p>Another caption</p> </div>This automatically puts captions, enclosed in paragraph tags, adjacent to photos.

When tables are not appropriate, the tabular effect is easy to create with non-tabular HTML.
.datelist { (properties of .container_12) } .datelist h4 { (properties of .grid_3) } .datelist p { (properties of .grid_7) } .datelist strong { (properties of .grid_1) } <div> <h4>subhead</h4> <p>…</p> <strong>3 p.m.</strong> <strong>Jan 1, 2010</strong> <h4>subhead</h4> <p>…</p> <strong>3 p.m.</strong> <strong>Jan 1, 2010</strong> </div>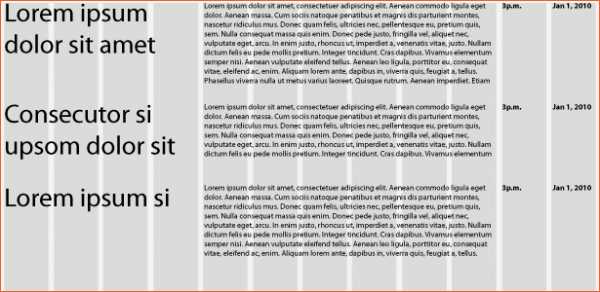
The example above is a schedule of events in which each “cell” in the table has a different tag to reflect its unique content, rather than having the catch-all <td> tag. (Ideal? Maybe not. The HTML doesn’t distinguish between groups of content.)
Applying .grid_x properties to other elements requires some planning, but it results in less-cluttered HTML and doesn’t interfere with 960.gs itself.
Use Classes in Parent Items, not Child Items
Div-itis and class-itis aren’t limited to CSS frameworks.
All of the examples in the last section share an interesting trait: only one class declaration in each. Wherever the same class attribute is used several times in a row in the HTML, change the parent instead of the children.
Unnecessary:
.item { (various properties) } <ul> <li>…</li> <li>…</li> <li>…</li> <li>…</li> <li>…</li> <li>…</li> </ul>Above, all six elements have a class. They’re redundant because the classes are identical. Here’s a better way:
.group-of-items li { (various properties) } <ul> <li>…</li> <li>…</li> <li>…</li> <li>…</li> <li>…</li> <li>…</li> </ul>The remedy here for class-itis is to assign a single class to the parent element. CSS selectors do the job, applying the styling to every <li> inside the .group-of-items class. This method can be used on any group of elements with a common parent. For example:
<div> <h2>…</h2> <h2>…</h2> <p>…</p> <p>…</p> <p>…</p> <p>…</p> <p>…</p> <p>…</p> </div> .title { (various properties) } .subhead { (various properties) } .publication-date { (various properties) } .body-text { (various properties) }Most of the paragraphs above are just simple paragraphs and yet have needless class attributes. We also have two headings, distinguished only by their classes—yet adjoining <h2> elements don’t make for a good content structure. Here is a better solution:
<div> <h2>…</h2> <h3>…</h3> <p>…</p> <p>…</p> <p>…</p> <p>…</p> <p>…</p> <p>…</p> </div> .article h2 { (various properties) } .article h3 { (various properties) } .article .publication-date { (various properties) } .article p { (various properties) }Now only two classes remain. We’ve kept the .publication-date class to distinguish it from the normal paragraphs below it. Because HTML doesn’t have a “date” tag, this class is necessary to show what the paragraph contains. The new .article class enables you to style that div and the elements in it in the CSS with minimal mark-up. The CSS in both examples has four definitions each, and yet we end up with much cleaner code in the second.
In general, identical elements with a common parent do not need extra attributes. Classes only help when there’s a difference between them. A rule of thumb: use classes only when you need to distinguish between otherwise identical types of content.
Simplify
The purpose of the 960 Grid System, and CSS frameworks in general, is to reduce the effort needed to lay out web pages. The benefit of CSS is that it reduces the amount of HTML necessary to display a page. But as a layout language, CSS isn’t perfect. Frameworks are merely tools that help people achieve solutions, not the solutions themselves. It’s up to designers and developers to combat class-itis and div-itis.
Written exclusively for Webdesigner Depot by Ben Gremillion. Ben is a freelance web designer who solves communication problems with better design.
How do you say more with less? Share how you streamline code and your workflow in the comments below…
www.webdesignerdepot.com
Structure / eecms style guide
Interaction Guidelines
Starting with ExpressionEngine 3.0 we're moving to a more flexible user interface and visual language. To create an inviting and useful UI for our content editors and site managers. Built on a solid foundation, making quick iterations not only possible, but easy. Maintaining familiarity for long time customers, and improving the interface for all customers.
UI Ideals
When expanding ExpressionEngine with new features, and add ons, always maintain the goals of familiarity and improvement. This style and interaction guide is both an internal map, and an external guide.
Navigation
Navigation should be clean, concise and to the point. If you require secondary navigation for a feature, add on or CP section, use a sidebar. Main navigation should never be more than one (1) level deep.
Column Group
ExpressionEngine 3 uses a fluid 16 column grid.
Grids are made of of rows and columns, class .col-group will create a row.
HTML
<div> ... </div>back to the top
Columns require two classes .col and a width class .w-n.
Columns inside a .col-group must add up to 16.
Example: two columns, .w-12 and .w-4.
HTML
<div> <div> ... </div> <div> ... </div> </div>back to the top
back to the top
Deprecation notice
This UI pattern is deprecated as of version 3.3.3, and will be removed in version 5.0.
Use Content Box, Text Box instead.
You can create a text only box by wrapping your text in div.txt-wrap
HTML
<div> <div> <div> </div> </div> <div> <div> <h2>Box header</h2> <div> <p>Lorem ipsum dolor sit amet, consectetur adipisicing elit, sed do eiusmod tempor incididunt ut labore et dolore magna aliqua. Ut enim ad minim veniam, quis nostrud exercitation ullamco laboris nisi ut aliquip ex ea commodo consequat. Duis aute irure dolor in reprehenderit in voluptate velit esse cillum dolore eu fugiat nulla pariatur. Excepteur sint occaecat cupidatat non proident, sunt in culpa qui officia deserunt mollit anim id est laborum.</p> <ul> <li>list item</li> <li>another list item</li> </ul> </div> </div> </div> </div>Visual Output
Lorem ipsum dolor sit amet, consectetur adipisicing elit, sed do eiusmod tempor incididunt ut labore et dolore magna aliqua. Ut enim ad minim veniam, quis nostrud exercitation ullamco laboris nisi ut aliquip ex ea commodo consequat. Duis aute irure dolor in reprehenderit in voluptate velit esse cillum dolore eu fugiat nulla pariatur. Excepteur sint occaecat cupidatat non proident, sunt in culpa qui officia deserunt mollit anim id est laborum.
- list item
- another list item
back to the top
You can create a text box by wrapping your text in div.md-wrap
HTML
<div> <div> <div> </div> </div> <div> <div> <h2>Box header</h2> <div> <p>Lorem ipsum dolor sit amet, consectetur adipisicing elit, sed do eiusmod tempor incididunt ut labore et dolore magna aliqua. Ut enim ad minim veniam, quis nostrud exercitation ullamco laboris nisi ut aliquip ex ea commodo consequat. Duis aute irure dolor in reprehenderit in voluptate velit esse cillum dolore eu fugiat nulla pariatur. Excepteur sint occaecat cupidatat non proident, sunt in culpa qui officia deserunt mollit anim id est laborum.</p> <ul> <li>list item</li> <li>another list item</li> </ul> </div> </div> </div> </div>Visual Output
Lorem ipsum dolor sit amet, consectetur adipisicing elit, sed do eiusmod tempor incididunt ut labore et dolore magna aliqua. Ut enim ad minim veniam, quis nostrud exercitation ullamco laboris nisi ut aliquip ex ea commodo consequat. Duis aute irure dolor in reprehenderit in voluptate velit esse cillum dolore eu fugiat nulla pariatur. Excepteur sint occaecat cupidatat non proident, sunt in culpa qui officia deserunt mollit anim id est laborum.
- list item
- another list item
back to the top
back to the top
The sidebar may contain basic lists. To create a basic list use an ul.
The basic list is used to list additional pages under a heading.
A basic list must have a heading.
HTML
<div> <div> <div> <h3>Header</h3> <ul> <li><a href="">List Item</a></li> </ul> <h3><a href="">Header</a></h3> <ul> <li><a href="">List Item</a></li> <li><a href="">Another List Item</a></li> </ul> <h3>Header</h3> <ul> <li><a href="">List Item</a></li> <li><a href="">Another List Item</a></li> <li><a href="">One More List Item</a></li> </ul> </div> </div> <div> <div> <h2>Box header</h2> </div> </div> </div>back to the top
Basic List Highlights Requires: Basic List
A basic list has an alternate item highlighting option.
- .remove indicates that clicking initiates a delete action.
HTML
<div> <div> <div> <h3>Header</h3> <ul> <li><a href="">List Item</a></li> </ul> <h3><a href="">Header</a></h3> <ul> <li><a href="">List Item</a></li> <li><a href="">Another List Item</a></li> </ul> <h3>Header</h3> <ul> <li><a href="">List Item</a></li> <li><a href="">Another List Item</a></li> <li><a href="">One More List Item</a></li> </ul> </div> </div> <div> <div> <h2>Box header</h2> </div> </div> </div>back to the top
The sidebar may contain a folder type list. Use a div.scroll-wrap wrapped around a ul.folder-list.
The div.scroll-wrap prevents the folder list from growing too large vertically.
A folder list should be used to represent directory structures, templates groups, upload directories, etc…
A folder list must have a heading.
A folder list, and a basic list may appear in the same sidebar.
HTML
<div> <div> <div> <h3>Header</h3> <div> <ul> <li><a href="">Folder</a></li> <li><a href="">Folder 2</a></li> <li><a href="">Folder 3</a></li> <li><a href="">Folder 4</a></li> <li><a href="">Folder 5</a></li> <li><a href="">Folder 6</a></li> <li><a href="">Folder 7</a></li> <li><a href="">Folder 8</a></li> <li><a href="">Folder 9</a></li> </ul> </div> <h3>Header</h3> <ul> <li><a href="">List Item</a></li> <li><a href="">Another List Item</a></li> <li><a href="">One More List Item</a></li> </ul> </div> </div> <div> <div> <h2>Box header</h2> </div> </div> </div>back to the top
Folder List Highlights Requires: Folder List
An folder list has two alternate item highlighting options.
- .act indicates the currently selected item.
- .default indicates the primary, or default item.
HTML
<div> <div> <div> <h3>Header</h3> <div> <ul> <li><a href="">Folder</a></li> <li><a href="">Folder 2</a></li> <li><a href="">Folder 3</a></li> <li><a href="">Folder 4</a></li> <li><a href="">Folder 5</a></li> <li><a href="">Folder 6</a></li> <li><a href="">Folder 7</a></li> <li><a href="">Folder 8</a></li> <li><a href="">Folder 9</a></li> </ul> </div> <h3>Header</h3> <ul> <li><a href="">List Item</a></li> <li><a href="">Another List Item</a></li> <li><a href="">One More List Item</a></li> </ul> </div> </div> <div> <div> <h2>Box header</h2> </div> </div> </div>back to the top
Folder List Toolbar Requires: Folder List
Each “folder li” in a folder list requires a toolbar.
The tool bar may include the tools .edit and .remove.
HTML
<div> <div> <div> <h3>Header</h3> <div> <ul> <li> <a href="">Folder</a> <ul> <li><a href=""></a></li> <li><a href=""></a></li> </ul> </li> <li> <a href="">Folder 2</a> <ul> <li><a href=""></a></li> <li><a href=""></a></li> </ul> </li> <li> <a href="">Folder 3</a> <ul> <li><a href=""></a></li> <li><a href=""></a></li> </ul> </li> </ul> </div> </div> </div> <div> <div> <h2>Box header</h2> </div> </div> </div>back to the top
Breadcrumb
A breadcrumb may be created by using ul.breadcrumb. The last crumb should be text only, and have a class of .last
A breadcrumb must appear inside the .w-12 content column, above the div.box.
HTML
<div> <div> <div> </div> </div> <div> <ul> <li><a href="">Home</a></li> <li><a href="">Section</a></li> <li>Area</li> </ul> <div> <h2>Box header</h2> </div> </div> </div>back to the top
back to the top
You can add a settings button to the section header. Use a .toolbar inside the h2.
HTML
<div> <div> <div> <form> <fieldset> <input placeholder="type phrase..." type="text" value=""> <input type="submit" value="search section"> </fieldset> <h2> Section Manager <ul> <li><a href="" title="settings"></a></li> </ul> </h2> </form> </div> </div> </div> <div> <div> <div> </div> </div> <div> <div> <h2>Box header</h2> </div> </div> </div>ellislab.com
Shoot to kill; CSS selector intent – CSS Wizardry – CSS Architecture, Web Performance Optimisation, and more, by Harry Roberts
17 July, 2012Written by Harry Roberts on CSS Wizardry.
One type of CSS in particular makes me cringe every time I see it; poor selector intent. Poor selector intent means carpet bombed selectors whose key selector has way too broad a reach; a selector like .header ul{} as opposed to one like .main-nav{}; .widget h3{} instead of .widget-title; article > p:first-child{} as opposed to .intro{}. Selectors whose intent isn’t specific enough.
It’s worth noting that selector intent is something I completely made up at some point today; if you think there’s a better name then please let me know!
Let’s take a closer look at the .header ul{} example. Let’s imagine that ul is indeed the main navigation for our website. It lives in the header, as you might expect, and is currently the only ul in there; .header ul{} is fine, right? Not really. I mean sure, it might work, but it’s not very good. It’s not very future proof and certainly not explicit enough. As soon as we add another ul to that header it will adopt the styling of our main nav and the the chances are we won’t want it to. This means we either have to refactor a lot of code or undo a lot of styling on subsequent uls in that .header to remove the effects of the far reaching selector.
Your selector’s intent must match that of your reason for styling something; ask yourself ‘am I selecting this because it’s a ul inside of .header or because it is my site’s main nav?’. The answer to this question will determine your selector.
It’s all about the key selector…
What determines the impact of a selector is its key selector. The key selector is a very important thing in the world of CSS as browsers read selectors right to left. This means the key selector is the last one before the opening {, for example:
.header ul { } .ul li a { } p:last-child { }As I discuss in Writing efficient CSS selectors, the key selector plays a big part in CSS efficiency, so it’s worth bearing that in mind, but where selector intent is concerned this is basically the place you need to be looking to see how far reaching your selector is. html > body > section.content > article span{} is a ridiculously convoluted and terrible selector that no one anywhere would ever write (right?) but despite how specific and disastrously over the top it is, its key selector (span) is still very, very broad. It doesn’t matter so much what comes before your key selector, it’s only the key that really matters.
As a general rule you should try and avoid any key selector that is a type selector (basically an element, like ul or span or whatever) or a base object (e.g. .nav or .media). Just because something is the only .media object in your content area it doesn’t mean it always will be.
Let’s keep looking at the .header ul{} example. Let’s assume our markup is thus, as we’re using the nav abstraction:
<div class=header> <ul class=nav> [links] </ul> </div>We could select this in one of several ways:
.header ul{ [main nav styles] }This is bad because as soon as we add any other ul to our header it will look like our main nav. This is dangerous but thankfully easily avoidable.
Secondly we could use:
.header .nav{ [main nav styles] }This is marginally better than the .header ul example, but barely so. We can now safely add another ul without risk, but we can’t add anything else with a .nav class; that means adding sub-navs or breadcrumbs will be a nightmare!
Finally, our best solution would be to add a second class to the ul; a class of .main-nav:
<div class=header> <ul> [links] </ul> </div> .main-nav{ [main nav styles] }This is good selector intent; we are selecting this element now for exactly the right reasons, not coincidental/circumstantial ones. Now we can add as many more uls and .navs to that .header and the scope of our main nav styles will never reach anything else. We’re no longer carpet bombing!
Keep your key selector as explicit and specific as you possibly can, preferring for it to be a class over anything else. Applying specific styling through a vague selector is dangerous. A generic selector should always carry generic styling and if you want to target something in particular you should perhaps add a class to it. Specific intent requires a specific selector.
Real-life example
A really good example of where I messed up on this myself is on a project I did at Sky; I had a selector which was simply #content table{}. (Eww, I even used an ID!!!) This is a troublesome selector for three reasons; firstly it uses an ID which is a big no, secondly it has a lot higher specificity than it needs to and lastly—and most importantly—it has a poor selector intent. I wasn’t wanting to style these tables because they were in #content, that was just how the DOM landed so that’s how I chose to target them. Entirely my bad.
For the first few weeks this was fine but then all of a sudden we needed to add some tables inside #content that didn’t want to look anything like the previous ones. Uh oh. My previous selector was far too far reaching, I was now having to undo a blanket style I’d set on every table in the #content div. If I’d had a better selector intent then instead of:
#content table{ [foo styles] } #content .bar{ [undoing foo styles] [bar styles] }I should/would have had:
.foo{ [foo styles] } .bar{ [bar styles] }And a lot less headaches. By thinking ahead and having a lot more considered selector intent then I would have had a much easier time…
Exceptions
Of course there are always exceptions. It’s perfectly reasonable to have selectors like .main-nav > li where your key selector is a type selector. It also makes perfect sense to target every a inside something like this:
html{ color:#333; background-color:#fff; } .promo{ color:#fff; background-color:#333; } .promo a{ color:#fff; text-decoration:underline; }That is a reasonably sensible far-reaching selector where it does make sense to style every a in a pretty carpet bombed manner.
Final word
In general, instead of carpet bombing your elements, shoot to kill; target them specifically and explicitly. Make sure your selector intent is accurate and targeted.
Think more carefully about why you want to target something and pick a more explicit and sensible selector; refine your selector intent. Do you mean:
or do you really mean:
Do you want:
or do you really want:
Is it wise to select:
or would a safer bet be:
Consider your CSS selectors’ intent; are you being specific enough? Are your selectors matching things for the right reasons, or is it just happy circumstance? Shoot to kill. Be a CSS sniper, not a CSS carpet bomber.
Incidentally, opting to switch out a longer selector like .header ul for something like .main-nav will also help reduce specificity and increase selector efficiency; win-win-win!
It is also worth noting that Jonathan Snook wrote something similar called the depth of applicability…
Did you enjoy this? Hire me!
csswizardry.com